Get ready for a wave of exciting new products powered by the recently released Raspberry Pi RP2350 microcontroller! You can check out the full list here
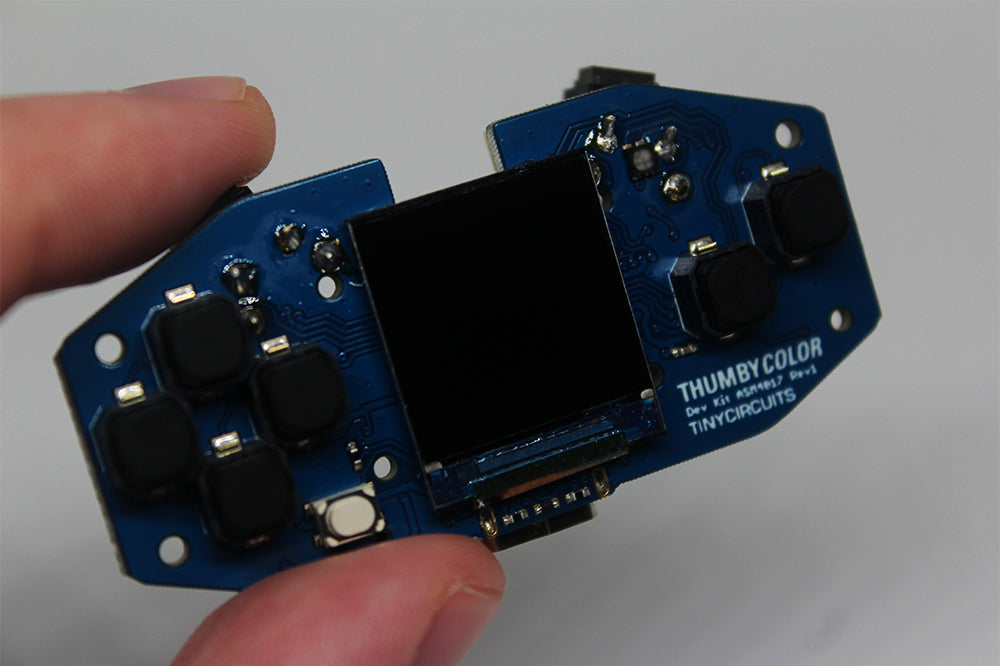
One of the first to hit the scene is the Thumby Color, a fantastic upgrade to the world's tiniest gaming console.
Made by Tiny Circuits, a company known for its tiny, open-source electronics creations, the Thumby Color takes the original Thumby's concept to the next level. While the original resembled the classic Game Boy, the Thumby Color gets a full-color makeover, drawing inspiration from the beloved Game Boy Advance.

The Thumby Color strikes the perfect balance: it's small enough to take anywhere, yet still comfortable and enjoyable to play. But the real game-changer (pun intended) is its powerful new engine. This engine empowers both beginner and experienced developers to create fun and complex games for the platform.
Just like its predecessor, Thumby Color games are completely free and open-source. That means you can tinker with them, modify them, and make them your own!
Tiny Circuits is currently raising funds for the Thumby Color on Kickstarter. However, if you're eager to get your hands on it and dive into development, you can order the Thumby Color Development Board.

The Thumby Color utilizes a customized version of the Raspberry Pi Pico with Micropython. This means you can code your own games using Python and the Thonny IDE. The board comes preloaded with 12 games to get you started, and you can even peek into their source code for inspiration.
While the official documentation for the Thumby Color is still under development, the potential for this tiny powerhouse is huge. It's important to note that this development board isn't a stock RP2350 board. It boasts nine additional buttons and a fancy NeoPixel-like RGB LED. This means it won't be able to run basic examples like "Blink" from the standard Pico Micropython examples.
1from machine import Pin, Timer
2
3led = Pin("LED", Pin.OUT)
4tim = Timer()
5def tick(timer):
6    global led
7    led.toggle()
8
9tim.init(freq=2.5, mode=Timer.PERIODIC, callback=tick)
There is nothing connected to LED even if it is defined:
>>> from machine import Pin
>>> help(Pin.board)
object <class 'board'> is of type type
  GP0 -- Pin(GPIO0, mode=IN, pull=PULL_UP)
  GP1 -- Pin(GPIO1, mode=IN, pull=PULL_UP)
  GP2 -- Pin(GPIO2, mode=IN, pull=PULL_UP)
  GP3 -- Pin(GPIO3, mode=IN, pull=PULL_UP)
  GP4 -- Pin(GPIO4, mode=OUT, pull=PULL_DOWN)
  GP5 -- Pin(GPIO5, mode=ALT, pull=PULL_DOWN, alt=PWM)
  GP6 -- Pin(GPIO6, mode=IN, pull=PULL_UP)
  GP7 -- Pin(GPIO7, mode=OUT, pull=PULL_DOWN)
  GP8 -- Pin(GPIO8, mode=ALT, pull=PULL_UP, alt=I2C)
  GP9 -- Pin(GPIO9, mode=ALT, pull=PULL_UP, alt=I2C)
  GP10 -- Pin(GPIO10, mode=ALT, alt=PWM)
  GP11 -- Pin(GPIO11, mode=ALT, alt=PWM)
  GP12 -- Pin(GPIO12, mode=ALT, alt=PWM)
  GP13 -- Pin(GPIO13, mode=ALT, pull=PULL_DOWN, alt=31)
  GP14 -- Pin(GPIO14, mode=ALT, pull=PULL_DOWN, alt=31)
  GP15 -- Pin(GPIO15, mode=ALT, pull=PULL_DOWN, alt=31)
  GP16 -- Pin(GPIO16, mode=OUT, pull=PULL_DOWN)
  GP17 -- Pin(GPIO17, mode=OUT, pull=PULL_DOWN)
  GP18 -- Pin(GPIO18, mode=ALT, pull=PULL_DOWN, alt=SPI)
  GP19 -- Pin(GPIO19, mode=ALT, pull=PULL_DOWN, alt=SPI)
  GP20 -- Pin(GPIO20, mode=OUT, pull=PULL_DOWN)
  GP21 -- Pin(GPIO21, mode=IN, pull=PULL_UP)
  GP22 -- Pin(GPIO22, mode=IN, pull=PULL_UP)
  LED -- Pin(GPIO25, mode=OUT)
  GP25 -- Pin(GPIO25, mode=OUT)
  GP26 -- Pin(GPIO26, mode=IN, pull=PULL_UP)
  GP27 -- Pin(GPIO27, mode=ALT, pull=PULL_DOWN, alt=31)
  GP28 -- Pin(GPIO28, mode=ALT, pull=PULL_DOWN, alt=31)
It looks like there pins defined for green, blue and red led: https://github.com/TinyCircuits/TinyCircuits-Tiny-Game-Engine/blob/main/src/io/engine_io_rp3.c#L23-L25
We can try to blink:
 1from machine import Pin
 2import time
 3
 4GREEN_PIN = 10
 5RED_PIN = 11
 6BLUE_PIN = 12
 7
 8green_led = Pin(GREEN_PIN, Pin.OUT)
 9blue_led = Pin(BLUE_PIN, Pin.OUT)
10red_led = Pin(RED_PIN, Pin.OUT)
11
12while True:
13    green_led.value(0)
14    time.sleep(1)
15    green_led.value(1)
16    time.sleep(1)
17    blue_led.value(0)
18    time.sleep(1)
19    blue_led.value(1)
20    time.sleep(1)
21    red_led.value(0)
22    time.sleep(1)
23    red_led.value(1)
24    time.sleep(1)
While you can't connect a soil moisture sensor to this board, the game engine provides access to additional hardware, such as the battery status.
 1import engine_draw
 2import engine_io
 3import engine_main
 4import engine
 5
 6from engine_math import Vector2
 7from engine_nodes import Text2DNode, CameraNode
 8
 9voltage = engine_io.battery_voltage()
10battery_level = engine_io.battery_level()
11charging = engine_io.is_charging()
12
13chargingText = "Charging: {}".format(('No', 'Yes')[charging])
14voltageText = f"Voltage : {voltage}"
15batteryText = f"Battery : {battery_level}"
16
17chargingTextNode = Text2DNode(text=chargingText,position=Vector2(-50, -25))
18voltageTextNode = Text2DNode(text=voltageText,position=Vector2(-50, -15))
19batteryTextNode = Text2DNode(text=batteryText,position=Vector2(-50, -5))
20cam = CameraNode()
21
22while True:
23    engine.tick()